
Types of Cloth Diapers - How to Fold and Sew Them
Index
Introduction: Types of Cloth Diapers:
Flat
Diapers
Prefolded
Diapers
Shaped
Diapers
Fitted
Diapers
Snap-to-Fit
Diapers
All-in-One
Diapers
Techniques to Fold Flat Square Diapers:
Kite-shaped
Technique for a Baby Boy
The Origami
Technique
The
Rectangular Technique
Techniques to Fold Flat Rectangular Diapers:
Standard
Pinned Fold Technique
Variation on
Standard Pinned Fold Technique
Basic Angel
Wing
Bikini Twist
Daytime
Doubling
Techniques to Fold Prefolded Diapers:
Triangle
Diaper Fold Technique
No Pin Cover
Fold Technique
Variation on
No Pin Cover Fold Technique
Standard
Pinned Fold Technique
Variation on
Standard Pinned Fold Technique
Basic Angel
Wing
Bikini Twist
Daytime
Doubling
Designing and Making Diapers for Adult Babies
Internet Fabric Sources for Making Diapers and Waterproof Pants
Introduction: Types of Cloth Diapers
Note: Almost all types of cloth diapers leak and must have some form of diaper cover or plastic pants. The exceptions are noted below.
Flat
Diapers
Flat diapers are rather large rectangles or squares of thin
material like gauze or Birdseye. In order to use them, they must
be folded and pinned in place. This type of diaper is a favorite
choice of many Adult Babies because they are the same style that
they wore when they were babies. Flat diapers of either fabric
can be subdivided into two types; square and rectangular. Most of
the exotic folding techniques were originally developed for
square diapers. I recommend a minimum size of a 48-inch square
for Adult Babies of average girth and up to 60 inches for Adult
Babies with extremely wide waists. There are only a few ways to
fold a rectangular flat diaper. Unfortunately, off-the-shelf
cloth diapers in adult sizes are all rectangular. Even
custom-made diapers by diaper companies are rectangular. If an
Adult Baby wants an old-fashioned square diaper, he will most
likely have to have a seamstress (or his mommy) make it for him
or make it himself. (Hint: Gauze diapers are the most absorbent
while Birdseye fabric is more long lasting. Gauze is more
susceptible to tearing from diaper pins than any other fabric.
Flat hemp diapers are the most long-wearing and the best
long-term investment of all types of diapers.) Fortunately, flat
diapers are extremely easy to make. See designing and making
square diapers for adult babies
Prefolded
Diapers
Prefolded diapers are much smaller than flat, and are usually
made of Birdseye, flannel (which is difficult to clean
thoroughly) or hemp (which is extremely absorbent and perfect for
overnight diapers). The center panels can be filled with cotton,
terrycloth, synthetic foam or even fibers derived from Sphagnum
Moss.. Although terry diapers are a favorite of ABs in Great
Britain, they are nearly impossible to wash properly to ensure
that all the fecal matter is removed from the diaper. On the
other hand, terrycloth is perfectly suitable for the absorbent
filling of the center panel because it is a highly absorbent
fabric and is protected from poop by the envelop of flannel or
cotton diaper cloth. The difference between a prefold and a flat
diaper is that a prefold has a absorptive center layer which is
created by manual folding in an old-fashioned flat diaper. (Thus
the name, "prefold".) There are several folding
techniques that can be used with prefolds.
Prefolds for babies come in three thicknesses with 2x6x2's being
the thinnest, 4x6x4's being slightly thicker, and 4x8x4's being
the thickest type. The specification refers to how many layers
are in each third of the diaper. For example, a 4x8x4 has 4
layers in the two outside panels and 8 layers in the middle
panel.
Diaper Service Quality (DSQ) or Chinese prefolds are the best
type of prefolded diapers. They are the thickest prefolds and
fluff up after a few washes. The name, "Chinese"
prefold, refers to the type of cotton used in their manufacture
rather than the manufacturing country. Cheaper diapers made from
inferior grades of cotton do not fluff up after washing and tend
to be very "leaky" Like flat diapers, prefolded diapers
require a waterproof cover over the diaper to prevent leaking.
Overnight
Diapering using Prefolded Diapers
If you use prefolded diapers, you can layer two of them together
and fold them as if you were folding one. This results in a very
thick diaper.
Shaped diapers are the next developmental step over the prefold
design. They are made to be wider in the back than in the front,
so folding to shape the diaper to be wider in the rear is not
required. Like flat diapers and prefolded diapers, shaped diapers
require a waterproof cover over the diaper to prevent leaking.
Overnight
Diapering using Shaped Diapers
If you use shaped diapers, you can layer two of them together and
fold them as if you were folding one. This too, results in a very
thick diaper.
Fitted
Diapers
Fitted diapers are the next evolution in cloth diapers. They are
hour-glass shaped with a wide rear and narrow front to fit the
bottom and pubic area closely. Like prefold and shaped diapers,
they have a center absorptive panel. Most often, they are
manufactured with with velcro, aplix (similar to velcro), or
snaps on the inside of the "wings" and on the front to
fasten the ends of the diaper together. If you are in the market
for fitted diapers, look for a style where the velcro/aplix
closure has an additional piece of velcro/aplix next to the wing
tab so that it can be folded back upon itself for washing so that
the diapers don't attach themselves to each other in the washing
machine. The other style of fitted diapers does not have integral
fasteners and require pinning. Like flat, prefolded, and shaped
diapers, fitted diapers require a waterproof cover over the
diaper to prevent leaking.
Overnight
Diapering using Fitted Diapers
If you use fitted diapers, use a regular diaper for the inner
layer and the next size up for the outer layer.
Snap-to-Fit
Diapers
Snap-to-fit diapers are like fitted diapers, but designed to be
used on a variety of adult sizes. The biggest drawback is that
snap diapers almost never fit perfectly and are either too loose
or too tight. If they are too tight, the snaps open up and the
diaper unfastens. This sort of adult cloth diaper is normally
sold by mail order houses like Sears™ or Pennys™ and
should only be used with adults who are immobile and bedridden.
They are a very poor choice for an "active" Adult Baby
as they will nearly always be too large to fit properly. Like
flat, prefolded, shaped, and fitted diapers, snap-to-fit diapers
require a waterproof cover over the diaper to prevent leaking.
All-in-One
Diapers
All-in-One diapers are the final stage in the evolution of cloth
diapers. They are shaped like fitted diapers, but have an
integral waterproof cover. These diapers do not require plastic
pants or diaper covers. However, the amount of detergent
necessary to clean soiling from the fabric of the diaper also
removes the oily plasticizers that keeps the plastic of the
waterproof cover pliant. They have a tendency to begin cracking
early in their service life. Fitted diapers with plastic pants
are a more economic choice in the long run and will last much
longer.
Overnight
Diapering using Diaper Doublers with All-in-One Diapers
Diaper Doublers are perfect for nighttime diapering. You can use
either custom-made doublers, or one or two shaped diapers, or a
prefolded diaper folded into thirds and placed inside the center
of the diaper.
Techniques to Fold Flat Square Diapers
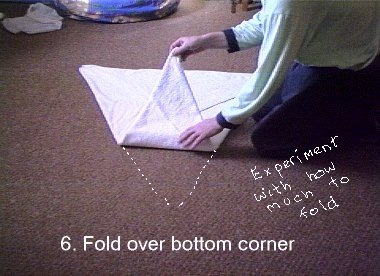
Kite-shaped Technique for a Baby Boy
This is
the original sketch of the technique using pictures of a baby.
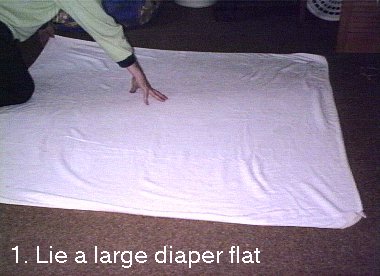
Spread out a 48" square diaper diagonally.
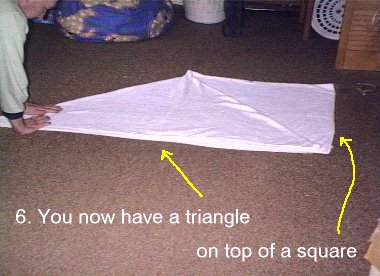
Fold the outer sides in so that the square becomes a triangle with the point facing you at the bottom.
Fold the top down the top portion to make a long triangle.
Fold the bottom portion up to truncate the pointed part of the triangle.
Have the baby lay down on the center of the diaper.

And pull up the back corners to the front.
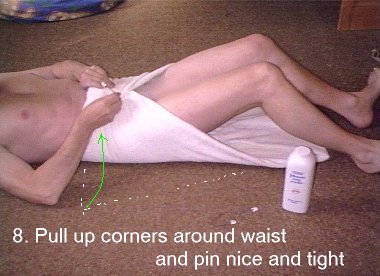
And pin the sides for a trim fit on either side
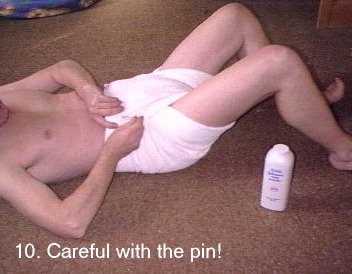
The finished diaper:

The Origami Technique
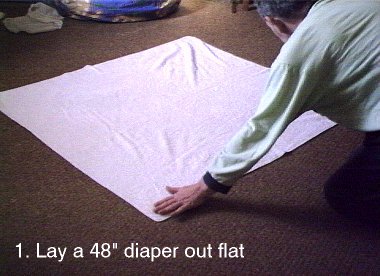
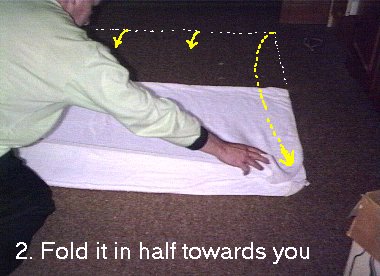
1. Lay a 48" square diaper down on the floor
2. Fold the 48" square diaper in half.
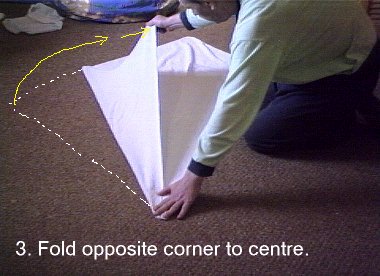
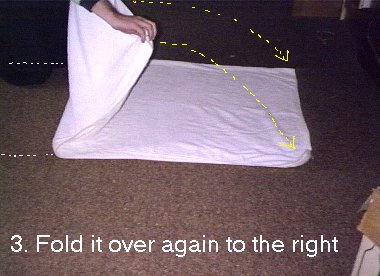
3. Fold again from left to right.
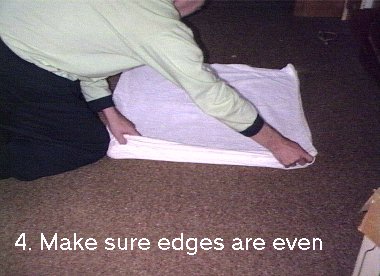
4. and even up the edges.
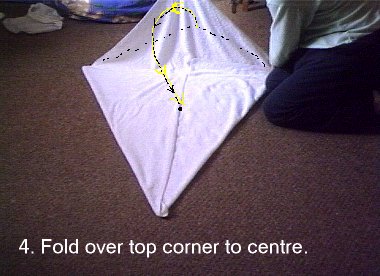
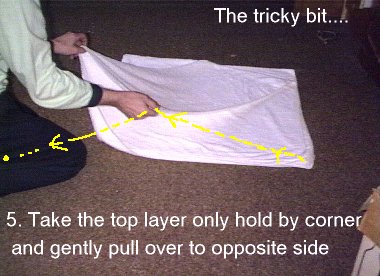
5. Take the top layer and gently pull across to form a triangular panel.
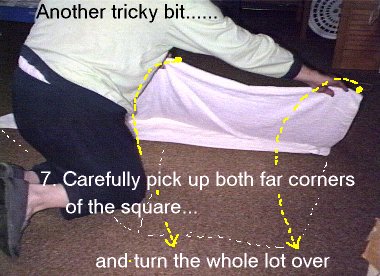
7. Reach over and pull the top corners of both layers towards you.
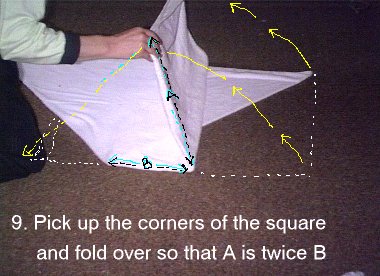
9. Pick up the squared ends of the fabric and draw them back over the middle such that the diaper is divided in thirds.
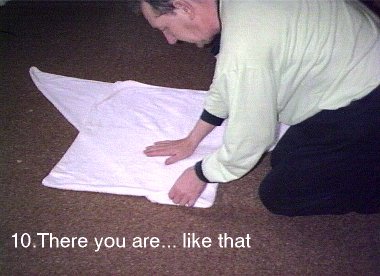
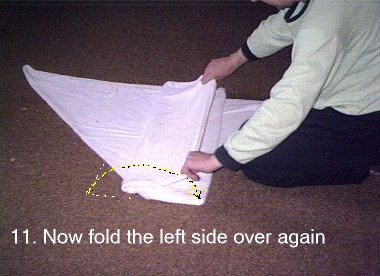
11. Fold the left side back on itself again to form a center panel.
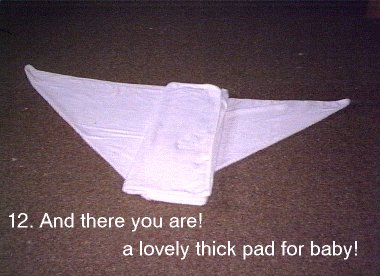
13. Have the baby lay or sit down on the diaper.
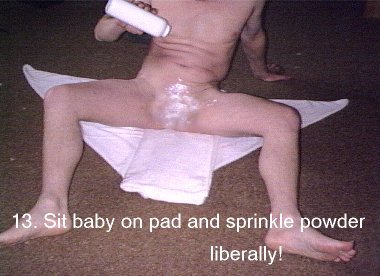
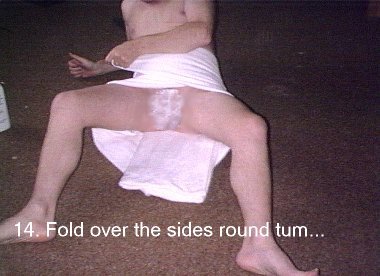
14. Fold over the sides…
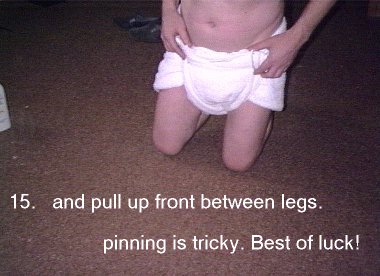
15. Pull front up between legs and pin together.
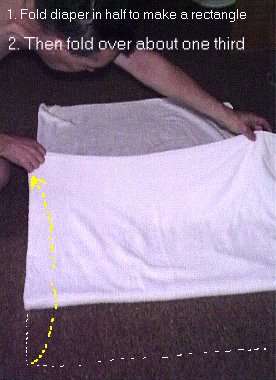
The Rectangular Technique
1. Lay a 48" square diaper down on the floor
2. Fold the 48" square diaper in half so that the diaper becomes a long rectangle with the narrow side nearest you. Next fold the front (or rear) of the diaper down one third of the way. The front is folded for baby boys and the rear is folded for baby girls.
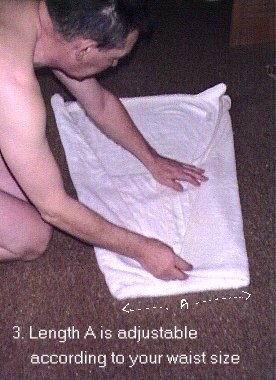
3. Next fold in the front edges on both sides to make the front narrower than the rear. The width of the front (A) can be adjusted for the baby's waist.
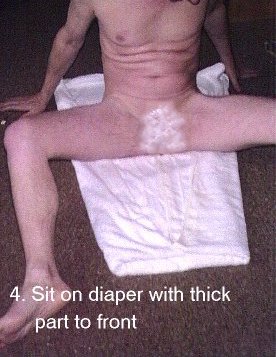
4. Have the baby sit down on the diaper.
5. Have the baby lay down on the diaper and pull the front of the diaper up between his legs.
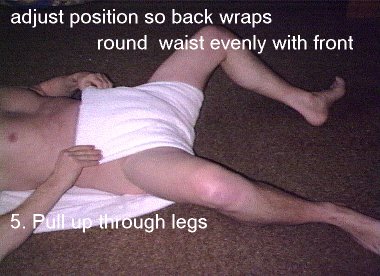
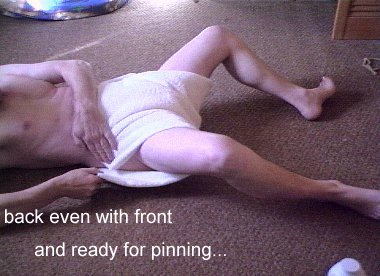
6. Next, bring the back even with the front to prepare the diaper for pinning.
7. Next, pin each side.
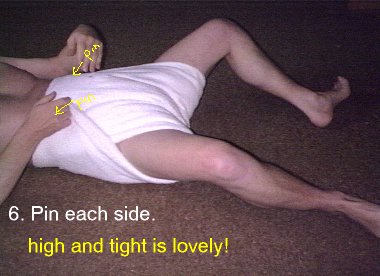
7. Although two pins are all you need, for the best fit and the least leaking however, use two longitudinal pins on either side. (Even physiological babies can have four pins with this technique.)
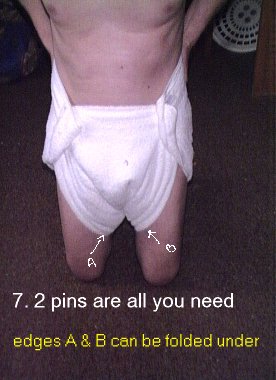
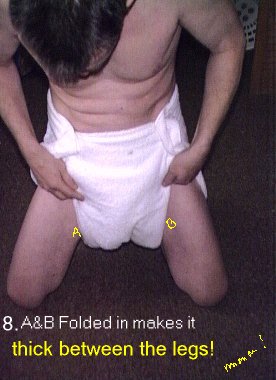
8. Fold the extra fabric between the legs to the inside of the diaper and you are finished.
Techniques to Fold Flat Rectangular Diapers
Standard
Pinned Fold Technique
(This style of fold requires two diaper pins.)
1. Lay the flat out in front of you.
2. Fold in
sides of the flat diaper on the end closest to you (this will end
up being the front of the diaper to meet in the middle.
3. Fold up front (the part you just folded in) 1/3 of the way.
4. Have the baby lay down on the diaper and bring the front part
up between the baby's legs.
5. Bring the back sides (wings) to the front and pin each side
with a diaper pin.
Advantages to this technique: This technique produces a trim fit with extra absorbency in the front for daytime use.
Disadvantages with this technique: This is not recommended for overnight use without doubling because of leakage problems while the baby lays on his back or side.
Overnight diapering technique: The diaper should be doubled.
Variation
on Standard Pinned Fold Technique
(This style of fold requires two diaper pins.)
1. Lay the flat diaper out flat in front of you and lay the baby
on top of it so the top edge is at the baby's waist (the diaper
will look too long).
2. Fold the part closest to you (the part that looks too long)
back as far as necessary to fit the baby.
3. Fold the part of the flat diaper you just folded down into
thirds bringing each side into the middle.
4. Bring this thick pad between the baby's legs.
5. Take each corner from the back and bring to the front and pin
each side.
Advantages to this technique: This technique produces a trim fit with extra absorbency in the front for daytime use.
Disadvantages with this technique: This is not recommended for overnight use without doubling because of leakage problems while the baby lays on his back or side.
Overnight diapering technique: The diaper should be doubled.
Basic Angel Wing
1. Fold the sides of the diaper across the center panel to form a pad.
2. Fold a small portion of the diaper up in the front.
3. Unfold the sides at the back of the diaper to form two wings.
4. Place the diaper under the baby. Bring the front of the diaper up between the baby's legs.
5. Bring the two wings around from the back and pin. Be sure to push the pin through only a few layers of fabric. It is not necessary to push the pin through all the layers of cotton.
Advantages to this technique: This technique produces a very trim fit with extra absorbency in the front for daytime use.
Disadvantages with this technique: This is not recommended for overnight use without doubling because of leakage problems while the baby lays on his back or side.
Overnight diapering technique: The diaper should be doubled.
Bikini
Twist
(Requires two diaper pins.)
1. Lay the prefolded diaper out flat in front of you.
2. Turn diaper all the way over at the midpoint, making somewhat of an "X" shape.
3. Have the baby lay down on top of the crossed over the flat diaper.
4. Maintaining the cross over, bring front up between baby's legs.
5. Bring back corners around to the front and pin on each side.
Advantages to this technique: This technique produces an excellent fit with no diaper "bunching" between the legs. The twist also makes the diaper tend to cup itself around the baby's bottom and keep his poop within his diaper. The twist are produces a very absorbent area between the legs, which works well for both baby boys and baby girls who are either standing up or laying on their back.
Disadvantages with this technique: This is not recommended for overnight use without doubling because of leakage problems while the baby lays on his back or side.
Overnight diapering technique: The diaper should be doubled.
Daytime Doubling
1. Start with a regular diaper.
2. Place the insert in the center of the diaper.
3. Fold the sides of the bottom diaper over the insert.
4.Fold a small portion of the diaper and insert up in front.
5. Unfold the sides of the bottom diaper in the back to form two wings.
6. Place the diaper under the baby. Bring the front of the diaper up between the baby's legs.
Techniques to Fold Prefolded Diapers
Triangle
Diaper Fold Technique
(This style of fold requires one diaper pin and a huge
rectangular diaper.)
1. Fold a huge prefolded diaper in half to form a square.
2. Fold the square in half to form a triangle.
3. Have the baby lay down on the diaper with the point of the
triangle pointing towards you and with the long edge along the
baby's back.
4. Bring the point of the diaper up between the baby's legs.
5. Bring the other points around to the front and pin with the
diaper pin.
Problems with this technique: This would require a huge prefolded diaper! The length=1.414 times the waist
Width = .707 times the waist. Thus, for a forty-inch waist, the length would be 56 1/2 inches and the width would be 28 1/4 inches at minimum! If extra absorbency is required by folding down the point between the baby's legs the diaper would have to be substantially larger!
No Pin
Cover Fold Technique
1. Fold a prefolded diaper into thirds.
2. Lay folded diaper in cover.
3. Spread open the back of the diaper slightly for better
coverage.
4. If it is too long for the cover, fold the diaper down in the
front to fit. This gives the front more urine absorbency where it
is needed during the day.
5. Have the baby lay down on the diaper and fasten the cover.
Disadvantages with this technique: This is not recommended for overnight use because of leakage problems while the baby lays on his back or side.
Variation
on No Pin Cover Fold Technique
1. Fold a prefolded diaper into thirds.
2. Lay folded diaper in cover.
3. If it is too long for the cover, fold the diaper down in the
front to fit.
4. Have the baby lay down on the diaper and fasten the cover.
Disadvantages with this technique: This is not recommended for overnight use because of leakage problems while the baby lays on his back or side.
Standard
Pinned Fold Technique
(This style of fold requires two diaper pins.)
1. Lay prefold flat in front of you.
2. Fold in sides of the prefold on the end closest to you (this
will end up being the front of the diaper to meet in the middle.
3. Fold up front (the part you just folded in) 1/3 of the way.
4. Have the baby lay down on the diaper and bring the front part
up between the baby's legs.
5. Bring the back sides (wings) to the front and pin each side
with a diaper pin.
Advantages to this technique: This technique produces a trim fit with extra absorbency in the front for daytime use.
Disadvantages with this technique: This is not recommended for overnight use without doubling because of leakage problems while the baby lays on his back or side.
Overnight diapering technique: The diaper should be doubled.
Variation
on Standard Pinned Fold Technique
(This style of fold requires two diaper pins.)
1. Lay the prefolded diaper out flat in front of you and lay the
baby on top of it so the top edge is at the baby's waist (the
prefold will look too long).
2. Fold the part closest to you (the part that looks too long)
back as far as necessary to fit the baby.
3. Fold the part of the prefolded diaper you just folded down
into thirds bringing each side into the middle.
4. Bring this thick pad between the baby's legs.
5. Take each corner from the back and bring to the front and pin
each side.
Advantages to this technique: This technique produces a trim fit with extra absorbency in the front for daytime use.
Disadvantages with this technique: This is not recommended for overnight use without doubling because of leakage problems while the baby lays on his back or side.
Designing and Making Square Diapers for Adult Babies
Decide on the type of square diaper fold that you are going to use.
If you are going to use a triangular fold, then eliminatory trigonometry yields the results that the width of a square diaper must be Width = .707 times the waist plus the overlap of the backside of the diaper on both sides. For example: A square diaper which is designed to have a minimum of six inches of overlap on a forty inch waist, must have a dimension of .707 times the combined ease plus the waist on a side, i.e., if the waist is taken at 40 inches with a side wing overlap of 6 inches, then the total length of the diaper when folded into an equilateral triangle must be .707 times the total width, i.e., 52 inches.
If you are going to use a Origami or Rectangular fold, . I recommend a minimum size of a 48-inch square for Adult Babies of average girth and up to 60 inches for Adult Babies with extremely wide waists.
Making a pattern. First get several paper grocery bags from the supermarket. Carefully tear open the bottom seam of the each bag. Next trim the ragged edges of the bottoms of the bags to make rectangles of brown paper and tape them together with masking tape. Alternatively, you can use brown wrapping paper or white butcher paper bought in rolls or lengths. For the Origami or Rectangular fold, start by making a 48" square and fold as in the instructions above to see how it fits your baby. Instead of pinning, use masking tape. If the diaper isn't big enough, make a larger square and see how it fits. Warning: Cloth normally comes in 36" and 48" widths and rarely in 60" widths. Find out how wide a diaper fabric your fabric store carries or can order for you. If the store only carries or can order 48" widths, then you'll have to piece it. Use the paper pattern to calculate the size. Don't forget to make a seam allowance of at 1/2 to 1 inch on both pieces.
If you have a Babyloc (What else would you use to make baby clothes, but a Babyloc?) Serger, serge the piece(s) first. If you don't have a Serger, then Zigzag stitch across the raw edges. Next sew the piece together (if more than one piece) using a double row of stitching on either side of the hem. I recommend folding the top of one piece down 1/2" and the other piece 1/2" up and fitting the two together like opposing "hooks", then pinning them in place with straight pins before sewing. This will produce a strong and long-lasting seam. Note: When you diaper the baby, make sure that the seam ends up in front across his waist so that your baby doesn't have an uncomfortable seam running up his rear end.
Designing and Making Rectangular Diapers for Adult Babies
How to
Make Inexpensive Fitted "Elastic-gathered" Diapers from
Prefolded Diapers:
If you discover that your baby's prefolded diapers or shaped
diapers are leaking, and haven't the money invest in more
expensive form-fitted diapers, a simple alteration will change
your baby's diapers into custom elastic-gathered fitted diapers.
Purchase some wide elastic-bathing suit elastic from your fabric
store in two sizes; 1/2 inch wide and 1" wide. The bathing
suit elastic is more resistant to wetness and will last longer.
For the legs, cut two strips about 18" long per diaper
(1"-4" less for small men, 4"-8" more for
large men - Test first!). Center a piece of 1/2" elastic on
each side of your baby's shaped diaper along the leg (or along
each side of the center panel on your baby's prefolded diaper).
Stretch out the elastic, pin it into place and zigzag stitch
down. Next place the 1" strip of elastic around your baby
and draw snuggly, but not too tight up to the place on his waist
that's under his arms. (Remember that the tape will be on the
outside of his diaper and thus will be just a bit too small.)
Measure your baby's waist and pin the elastic to the diaper in
the back center, then stretch out and pin the ends of the elastic
to 1/4 of your baby's total waist measurement from the center of
the back to the side of the diaper on each side. Next zigzag
stitch the elastic back-band down. Your baby's diapers will now
fit him like a glove. Note: Always make sure that the
elastic side of the diaper is facing outward when you diaper your
baby. If you want to make your baby's new elastic-gathered fitted
diapers pinless, see the next paragraph below.
How to
Make Inexpensive Fitted "Pinless" Diapers from
Prefolded Diapers:
Is your baby tired of being "stuck" by diaper pins or
he is so active that he breaks or bends them, but all you can
afford are prefolded diapers? You could use "blanket
pins" to fasten your baby's diapers, but they are so large
that they will destroy the fabric of your baby's diaper in no
time!
But if you
add some Velcro® to your baby's diapers, you can turn them into
pinless fitted diapers! All you have to do is fold a diaper to
fit your baby, and straight pin a 6"-8" strip of wide
loop Velcro® across the front of the diaper. Next straight pin
2"-4" strip of wide hook Velcro® to the top-inside of
the diaper, coming round from baby's back, with one strip on each
(in)side of your baby's waist and over the front of the diaper.
Make sure the Velcro® hook and loop strips will hold your baby's
diaper together snugly and securely, then remove the diaper from
your baby, and sew the Velcro® strips in place with a zigzag
stitch, going around each strip twice with your sewing machine.
Use the fitted diaper you just made as a pattern to mark and
alter the rest of your baby's diapers.
Internet Fabric Sources for Making Diapers and Waterproof Pants
New Conceptions - Polyurethane Laminate, Flannel, Stretch
Terry, Diaper and Cover pattern.
SewBaby - Ultrex, Polartec Fleece, Knits and Snap Source Snaps.
Sweet Hearts - Aplix, Polartec Fleece, Knits, Ultrex.
The Snap Source - Snaps
![]()